
Discover the wonders of composting, no matter where you call home. Whether you have a sprawling green property or enjoy sunset views from a cozy condo in Orchard Park, Western New York, USA, there’s a composting method that suits your space. Let’s dive into the fascinating world of composting methods and their unique advantages.
Hot and Cold Composting
Hot composting, as the name suggests, harnesses heat to break down organic matter quickly and thoroughly. Achieving temperatures of up to 140 to 160°F in the compost pile’s core, this method facilitates rapid decomposition while eliminating pathogens and weed seeds. Hot composting requires careful management of the carbon-to-nitrogen ratio, moisture levels, and oxygen levels. Aerobic bacteria thrive during this high-temperature decomposition process. If you’re looking for fast and safe compost, hot composting is an excellent choice, whether indoors or outdoors.
On the other hand, cold composting is a more relaxed and slower process. Simply create a compost pile and leave it be until the next year. It begins with aerobic decomposition and mild heating, transitioning to anaerobic bacteria domination. Cold composting is ideal if you’re in no hurry to use your compost and can be done without much fuss. However, it’s essential to avoid adding weeds and pathogens to your cold compost pile. Be mindful that it may emit a strong odor and is not suitable for indoor composting.
Vermicomposting
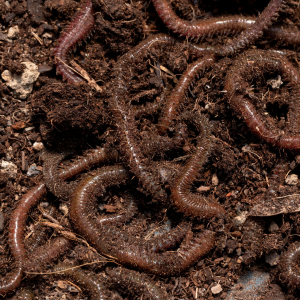
Vermicomposting, also known as bio-composting, relies on worms to break down organic waste. It’s a quick and odorless method, perfect for recycling food scraps, especially in indoor compost bins. Red worms, in particular, play a crucial role in this process, breaking down organic matter and producing nutrient-rich compost known as vermicompost or worm castings. Vermicomposting also yields a valuable byproduct called worm leachate, a liquid fertilizer that can be diluted for plant nourishment.
You can easily purchase Red Wiggler worms for vermicomposting online from trusted sources like Uncle Jim’s Worm Farm and Arcadia Garden.
Bokashi “Composting”
While widely popular among apartment dwellers seeking organic fertilizer from food scraps, the Bokashi method differs from traditional composting. Instead of decomposition, it ferments food waste using anaerobic microorganisms, accelerated by an activating solution called Bokashi bran. After a two-week fermentation period, the waste is suitable for outdoor composting or direct application to garden soil. Bokashi is excellent for composting challenging items like dairy, meat, and eggs. The fermentation process also produces a liquid called compost tea or Bokashi tea, an outstanding fertilizer when diluted at a 1:100 ratio.
Bokashi kits are readily available online at retailers like Amazon, Walmart, and home and garden stores.
Indoor, Outdoor, and Community Composting
Composting can be tailored to your space and needs. Whether you’re creating a compost pile in your backyard, using an airtight container indoors, or participating in a community composting program, there’s an option for you.
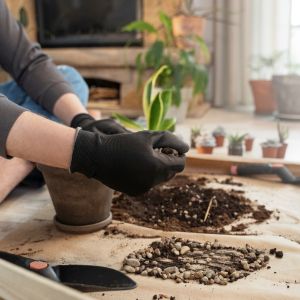
Indoor composting is an eco-friendly way to reduce household waste and generate high-quality fertilizer for potted plants using kitchen scraps. To ensure a pleasant indoor environment, consider methods like vermicomposting or Bokashi composting. Indoor compost bins are designed to store food waste but are not suitable for garden trimmings like tree branches.
Outdoor or backyard composting is the most common method for those with ample yard space. It offers flexibility in container choices and is perfect for composting garden waste.
Community-scale composting programs, whether privately managed or by municipalities, allow you to contribute to controlled waste decomposition. This is a practical solution if space is limited at home. Check the map of community composters across the United States to find a program in your area.
Compost Bins: To Use or Not To Use?
While composting doesn’t always require a bin, having one can simplify and expedite the process. Various types of compost bins cater to different needs:
- Open Bins: Ideal for composting garden waste, these provide minimal environmental protection but are easy and inexpensive to build. They offer excellent ventilation but may require more frequent watering in dry climates and can be susceptible to pests.
- Closed Bins: Suited for composting food waste, these bins resemble boxes made of plastic or wood with or without bottomless designs. They protect against pests and the environment, promote efficient heating, and help maintain moisture levels. However, they are more expensive and require regular turning.
- Tumbler Bins: These bins simplify composting with their built-in mechanism for easy turning, ensuring proper aeration and mixing. They retain moisture while allowing airflow. Tumblers expedite decomposition, typically within 3 weeks to 2 months, but can be pricier than open or closed bins.
- Trench Composting: A low-maintenance, bin-free option, trench composting involves burying organic waste directly in the soil. It’s an excellent method for enriching garden soil, with the trenches placed between vegetable rows. Trench composting requires minimal effort, doesn’t require aeration or rotation, and benefits nearby plants by gradually releasing liquid fertilizer.
Essential Compost Ingredients
- Creating high-quality compost relies on four essential ingredients: carbon, nitrogen, water, and air.
- Carbon: Often referred to as ‘brown waste,’ carbon-rich materials include dry leaves, twigs, wood chips, cardboard, straw, and more. These materials serve as the dry component in compost, feeding the decomposing microorganisms.
- Nitrogen: Termed ‘green waste,’ nitrogen-rich materials consist of fruit and vegetable scraps, coffee grounds, grass clippings, and animal manure. These materials add moisture and promote heating within the compost pile.
- Oxygen and Aeration: Microorganisms driving compost decomposition need oxygen to thrive. Proper ventilation helps them multiply and work efficiently. Turning the compost weekly in summer, and every few weeks in winter, is recommended.
- Moisture: Microorganisms require a moist environment to function optimally. The ideal moisture level in compost is like a wrung-out sponge, containing approximately 40-50% moisture. Adjust moisture levels as needed by adding water or dry materials and aerating the pile.
The Ideal Carbon-to-Nitrogen Ratio
The carbon-to-nitrogen ratio (C:N ratio) plays a crucial role in composting. Most studies recommend a C:N ratio between 25:1 and 30:1 to support efficient bacteria activity. While various materials have different C:N ratios, a general rule of thumb is to add 2 to 4 parts of brown material for every part of green material.
What Not to Compost
To maintain the integrity of your compost, avoid adding certain materials, including:

- Dairy products
- Eggs
- Meat scraps and bones
- Fats, oils, grease, and lard
- Pet waste and trash
- Coal or charcoal ash
- Garden trimmings treated with pesticides
- All parts of black walnut trees
- Diseased plants or those with pest infestations
- Colored and glossy cardboard or paper
- Garlic and onions (due to acidity)
- Citrus waste (acidic in large quantities)
- Dryer lint with synthetic fibers
- Inorganic substances like plastics and metals
6 Steps to Creating High-Quality Compost
Creating exceptional compost is achievable in six straightforward steps:
Step 1: Set Up Collection Points Designate areas for collecting kitchen waste and yard waste separately. Kitchen waste collection can include containers under the sink, on countertops, or even in the freezer. For yard waste, maintain an outdoor area for storing twigs, clippings, and leaves, ensuring these piles don’t linger too long to avoid attracting pests.
Step 2: Choose a Composting Location Select an appropriate location for your compost bin or pile. Consider the size of your bin and the available space. Ensure good drainage, proximity to a water source, and avoid placing it under wooden fences that may rot due to composting.
Step 3: Prepare Ingredients Cut or shred your compost ingredients into small pieces, roughly the size of your thumb. Chopping up food waste before adding it to the pile will accelerate decomposition.
Step 4: Build Your Compost Pile Begin by creating a 4 to 6-inch layer of wood chips and twigs at the bottom of your compost pile to absorb excess moisture and provide aeration. Alternate layers of green (nitrogen-rich) and brown (carbon-rich) materials. Maintain a moisture level akin to a wrung-out sponge. Finish with a thick brown layer to deter pests and prevent rainwater infiltration.
Step 5: Manage Your Compost Regularly check and maintain your compost pile by ensuring it stays reasonably moist and well-aerated. Use a rake or garden fork to turn the pile weekly in the summer and every few weeks in winter. Adjust moisture levels as needed.
Step 6: Let Your Compost Mature The maturation period for compost signifies the end of decomposition.
- During this phase:
- Compost texture becomes finer.
- Organic acids present in compost rise to near-neutral pH levels.
- Decomposing bacteria and fungi populations decrease.
- Phytotoxic substances are removed.
- The compost cools and hardens.
You’ll know your compost is ready when it exhibits these characteristics. It should have a fresh, earthy scent, like forest soil. You can then incorporate it into your gardening endeavors.
Using Your Compost

Finished compost has versatile applications:
- Soil Improvement: Enrich your garden topsoil with compost to enhance plant growth and soil quality.
- Mulch: Use compost as mulch in gardens, flower beds, and lawns to release nutrients gradually, retain moisture, and regulate temperature.
- Top Dressing: When planting or replanting a lawn, apply compost as a top dressing to provide essential nutrients and improve soil contact with grass seeds.
- Potting Soil: Create a rich and well-draining potting mix by combining compost with garden soil, suitable for indoor and outdoor potted plants.
Embrace the magic of homemade compost and reap the benefits of sustainable gardening and lawn care. If you’re uncertain about starting a compost pile, reach out to local lawn care professionals specializing in organic soil amendments. Unlock the potential of free, natural compost by taking the first steps towards sustainable living!